Git配置
配置用户信息
- 全局配置用户名和邮箱。
shell
git config --global user.name "Your Name"
git config --global user.email "[email protected]"- 局部配置用户名和邮箱,只针对当前所在的仓库生效。
shell
git config --local user.name "Your Name"
git config --local user.email "[email protected]"- 针对于当前系统配置用户名和邮箱。
shell
git config --system user.name "Your Name"
git config --system user.email "[email protected]"- 可以使用
git config --list命令查看当前配置信息。
shell
git config --list

# local【只有配置了local才能查看local的信息】
git config --local --list

# global
git config --global --list

# system
git config --system --list- 可以使用
git config --unset命令删除配置信息。
shell
# 清除git配置的用户名,这里是作用域是local
git config --unset --local user.name '用户名'

# 清除git配置的用户名,这里是作用域是global
git config --unset --global user.name '用户名'

# 清除git配置的用户名,这里是作用域是system
git config --unset --system user.name '用户名'配置ssh密钥
生成公私密钥
shell
# 示例
ssh-keygen -t rsa -C '[email protected]'

# 可以使用 --help 查看帮助
ssh-keygen --help生成好rsa公钥会在当前系统用户目录下生成一个 .ssh 的文件夹,该文件内是生成好的公私密钥。
添加公钥到GitHub
然后将rsa公钥上传到GitHub上面,以下是上传步骤:
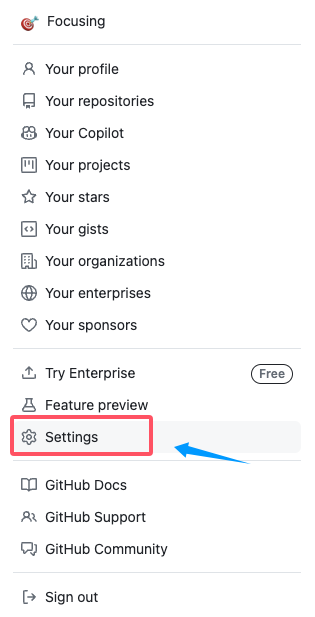
- 打开GitHub,点击右上角头像,选择Settings。


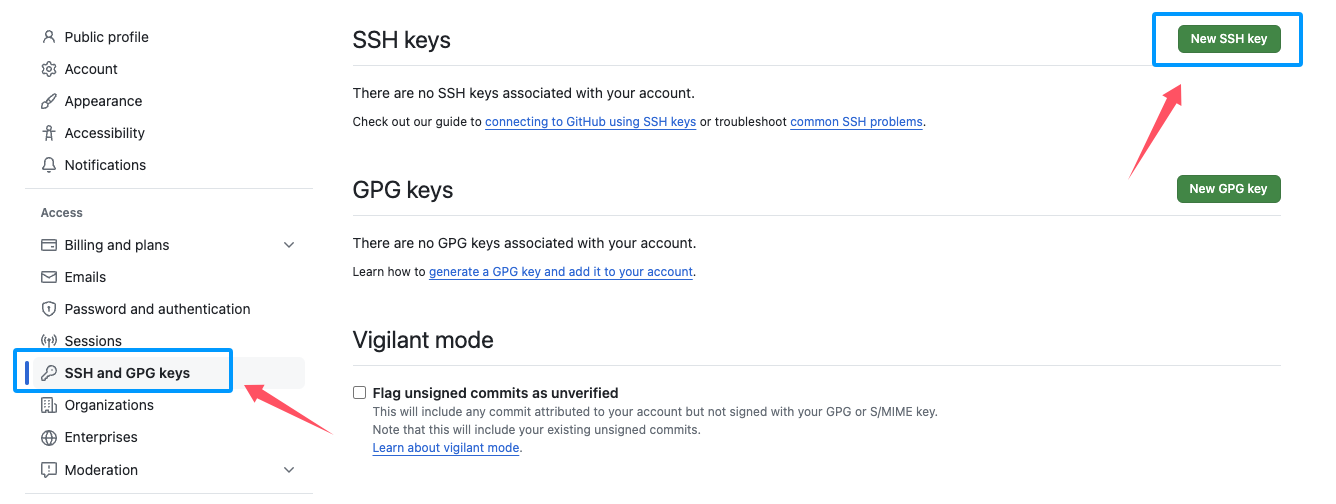
- 点击左侧边栏的SSH and GPG keys,点击右上角的New SSH key。

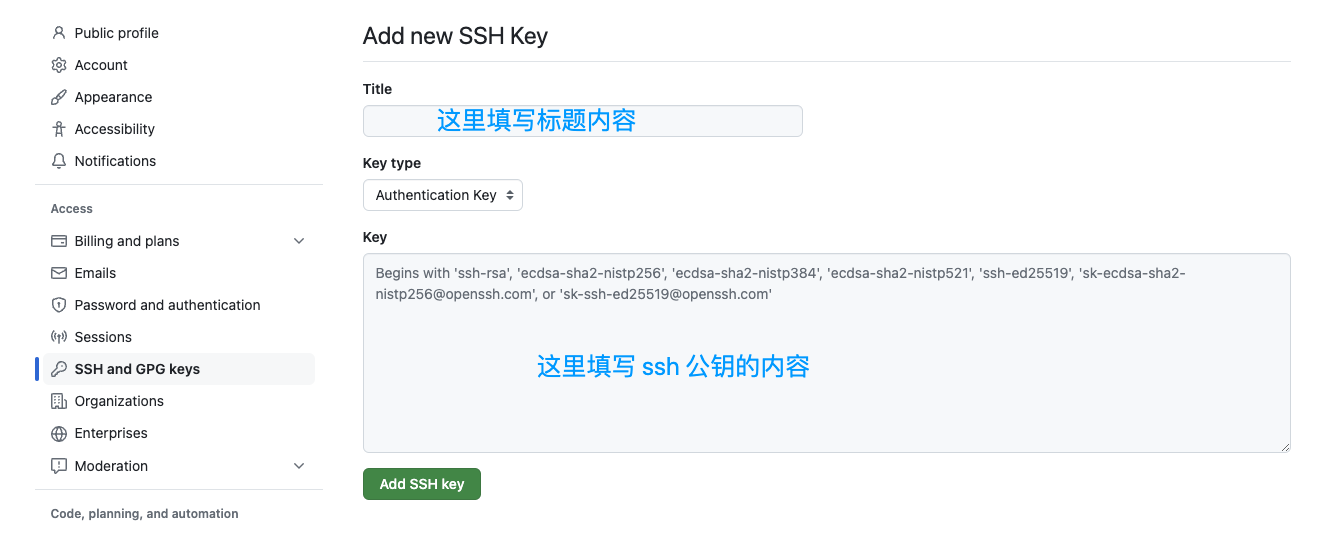
- 输入一个描述,然后复制公钥,粘贴到Key中,点击Add SSH key。

- 成功添加公钥之后,开始配置ssh配置文件,在当前系统用户目录下找到
.ssh文件夹,打开config文件【这个文件没有任何后缀,就叫config】,添加如下内容:
shell
# GitHub
Host github.com
HostName github.com
PreferredAuthentications publickey
IdentityFile 私钥路径
User 用户名config 文件内容说明:
Host:域名的别名,用户自定义,定义一个主机别名,这里是 GitHub 的主机别名。HostName:使用ssh协议的域名,*:表示0~n个非空白字符,指定要连接的远程主机的域名或 IP 地址,这里是 GitHub 的服务器。PreferredAuthentications:强制使用Public Key验证,指定首选的身份验证方式为公钥验证。IdentityFile:密钥文件的路径,指定用于身份验证的私钥文件的路径,这里是默认的私钥文件路径。User:用户名,指定要连接的远程主机的用户名,这里是 GitHub【对应平台的用户名】 的用户名。
- 配置完成后,使用
ssh -T [email protected]命令测试是否配置成功。
shell
ssh -T [email protected]- 测试成功之后,就可以使用
git clone命令来克隆仓库了。
设置代理
全局代理设置
前提条件:可以魔法上网【使用 Clash、Shadowsocks 还是 V2ray 的客户端可以】。
注意各个梯子的客户端使用的端口号即可,Shadowsocks一般是1080,Clash一般是7890,这里我使用的是 Clash 为例子。
代理使用 http 协议,使用 git config --global http.proxy 命令设置代理。
shell
# 全局代理 http 协议
git config --global http.proxy http://127.0.0.1:7890

# 只针对某个域名进行代理
git config --global http.https://github.com.proxy http://127.0.0.1:7890代理使用 https 协议,使用 git config --global https.proxy 命令设置代理。
shell
# 全局代理
git config --global https.proxy https://127.0.0.1:7890

# 只针对某个域名进行代理
git config --global https.https://github.com.proxy https://127.0.0.1:7890代理使用 socket 协议,使用 git config --global https.proxy 命令设置代理。
shell
# 全局代理
git config --global https.proxy socks5://127.0.0.1:7890

# 只针对某个域名进行代理
git config --global https.https://github.com.proxy socks5://127.0.0.1:7890取消代理设置。
shell
git config --global --unset http.proxy
git config --global --unset https.proxy查看已有的配置。
shell
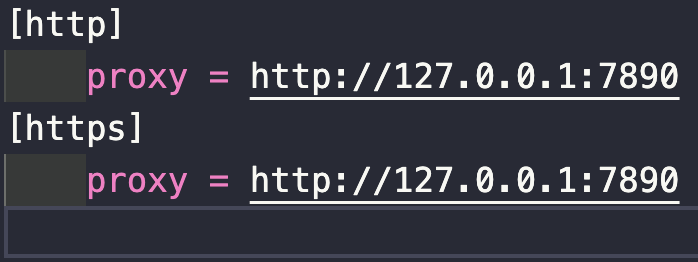
git config --global --list配置完代理配置之后,在当前用户目录下有个 .gitconfig 的配置文件,打开文件查看是否有以下配置内容。

配置 ssh 代理
在配置完成 .gitconfig 的代理配置之后,需要修改一下 .ssh 目录下的 config 配置文件,添加如下内容:
shell
# GitHub(这里是修改后的配置内容)
Host github.com
HostName github.com
PreferredAuthentications publickey
IdentityFile 私钥路径
User 用户名
Port 443
# ProxyCommand 代理机制根据操作系统,二选一
ProxyCommand connect -S 127.0.0.1:7890 %h %p # Windows 井号后面的注释记得删除
ProxyCommand /usr/bin/nc -X 5 -x 127.0.0.1:7890 %h %p # Linux MacOS 井号后面的注释记得删除
TCPKeepAlive yes
ServerAliveInterval 60
ServerAliveCountMax 5config 文件内容说明:
Host:域名的别名,用户自定义,定义一个主机别名,这里是 GitHub 的主机别名。HostName:使用ssh协议的域名,*:表示0~n个非空白字符,指定要连接的远程主机的域名或 IP 地址,这里是 GitHub 的服务器。PreferredAuthentications:强制使用Public Key验证,指定首选的身份验证方式为公钥验证。IdentityFile:密钥文件的路径,指定用于身份验证的私钥文件的路径,这里是默认的私钥文件路径。User:用户名,指定要连接的远程主机的用户名,这里是 GitHub【对应平台的用户名】 的用户名。Port:指定使用的 SSH 端口号,这里是设置为 443,与 HTTPS 协议的默认端口一致。ProxyCommand:代理机制,指定代理命令,这里使用nc命令通过本地代理服务器进行连接。TCPKeepAlive:表示服务器主动向客户端发送请求,请求客户端响应就继续保持连接。ServerAliveInterval:这里设置60表示客户端每60秒发起一次请求。ServerAliveCountMax:这里设置30表示客户端发送请求的最大次数。
解决git status命令中文乱码问题
使用 git status 命令时,中文会乱码,如下图所示:

shell
git config --global core.quotepath false提示
文档正在更新中...
配置全局默认的.gitignore文件
- 创建一个
.gitignore_global文件,在.gitignore_global文件中加入需要忽略的规则。 - 配置 Git 使用这个全局
.gitignore_global文件。
shell
# filepath 表示 .gitignore_global 文件的路径
git config --global core.excludesfile filepath

# 示例
git config --global core.excludesfile ~/.gitignore_global